How to Set Up a Barcode System From Scratch: A Step-by-Step Guide
A barcode system can turn slow, error-prone manual entry into fast, accurate data capture. But setting one up from nothing raises a lot of questions: which barcode type to use, what to print, which scanners to buy, and how it all connects to your software.
The good news is that the process follows a clear order. This guide walks through it step by step, so each decision builds on the one before it.
Want help planning your barcode system? Tell our team what you need to track and we will suggest a setup that fits.
What Is a Barcode System?
A barcode system is the combination of codes, labels, printers, scanners and software that lets you identify items and record what happens to them automatically.
It has four main parts:
- Barcodes: the codes that identify products, locations, assets or documents
- Labels and printers: how those codes are produced and attached
- Scanners or mobile computers: how the codes are read
- Software: where the scanned data is stored and used, such as a POS, inventory or warehouse system
A weak link in any one of these will slow down the whole system, so it helps to plan them together.
Step-by-Step: Setting Up Your Barcode System
Step 1: Define What You Want to Track
Start with the problem, not the equipment. Decide what the barcode system must do and where:
- Products at the point of sale
- Stock in a storeroom or warehouse
- Shelf, bin or storage locations
- Fixed assets such as equipment or devices
- Documents, parcels or deliveries
Also note how many items you handle, how many people will scan, and whether scanning happens at a desk, a counter or on the move. These answers shape every later choice.
Step 2: Choose the Right Barcode Type
There are many barcode formats, called symbologies. You only need to pick the ones that suit your use. The table below shows common choices.
| Barcode type | Format | Commonly used for |
|---|---|---|
| EAN / UPC | 1D (linear) | Retail products sold at the point of sale |
| Code 128 | 1D (linear) | Internal tracking, shipping and location labels |
| QR Code | 2D | Storing more data in a small area; scanned with 2D imagers |
| Data Matrix | 2D | Marking small items where space is tight |
If you sell products through retailers or marketplaces, they usually expect standard EAN or UPC barcodes, which are issued through GS1. Check the requirements of the retailers you sell through. For purely internal tracking, you can create your own codes using a format such as Code 128.
Your choice also decides which scanner you need. A 1D scanner reads linear barcodes only, while a 2D imager reads both linear and 2D codes. Our guide to 1D vs 2D barcode scanners explains the difference in more detail.
Step 3: Plan Your Product and Location Numbering
Every item, variant or location needs its own unique code. Before you print anything, decide on a clear numbering scheme:
- Give each sellable item and each variant, such as size or colour, a separate code
- Never reuse one code for two different products
- Keep codes short and consistent so they stay easy to read and manage
- Record supplier barcodes and your own internal codes against the same product
Fixing numbering mistakes after thousands of labels are printed is expensive, so this step is worth taking slowly.
Step 4: Choose Your Labels and Printer
Labels are where your system meets the real world, so they need to stay readable for as long as they are in use.
Direct thermal labels print with heat alone and need no ribbon, but the print can fade over time with heat and light. Thermal transfer labels print using a ribbon and suit labels that must last longer. Choose the label material, size and ribbon to match where the label will be used, then pick a printer that supports them.
Browse our thermal label printers, direct thermal labels, thermal transfer labels and wax ribbons.
Step 5: Select Your Scanners or Mobile Computers
Match the device to the job:
- Fixed or handheld scanners for checkouts and counters
- Wireless scanners for stock counts and receiving, where staff need to move around
- Mobile computers when you want scanning, a screen and software in one device
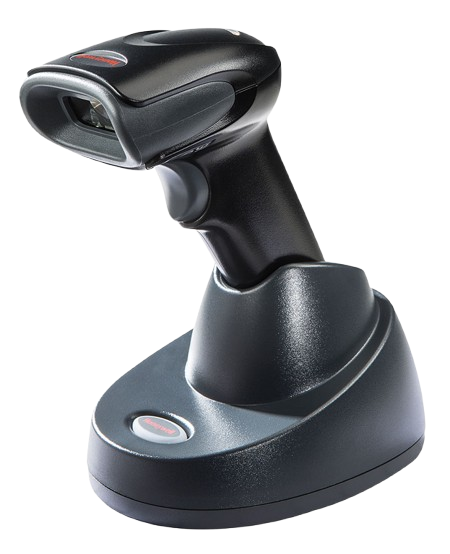
Also check which codes the device can read, how rugged it needs to be, and whether it needs a charging cradle. For example, the Honeywell Voyager 1472g is listed on our site as a wireless 2D barcode scanner with a USB cradle kit.
See our full range of barcode scanners and mobile computers and PDAs.
Step 6: Connect Everything to Your Software
A scanner only captures a code. The value comes from the software that receives it. Decide where scanned data should go and check that your devices and software work together before you buy:
- A point of sale (POS) system for retail sales and stock
- A warehouse management system (WMS) for receiving, storage and fulfillment
- An ERP system that links stock with finance and purchasing
Also plan the practical side: Wi-Fi coverage where staff will scan, and how scanners connect to computers or the system.
Step 7: Test, Pilot and Train
Before rolling out to the whole business, run a small trial:
- Print a sample batch of labels and test that every code scans on every device
- Try scanning in real conditions, such as poor lighting and different surfaces
- Check that scanned data appears correctly in your software
- Write a short routine for receiving, counting and returns, and train every team member on it
Fix any problems at this stage, while the scale is still small.
Step 8: Roll Out and Maintain
Once the pilot works, expand step by step. Then keep the system healthy: check label quality regularly, keep print heads clean, charge wireless devices, add new products to the system before they arrive, and keep a spare scanner on hand.
Need the full setup supplied and configured? Pointus Solutions can recommend and supply scanners, labels, printers and mobile computers for your barcode system.
Common Setup Mistakes to Avoid
Buying Hardware Before Defining the Need
Start with what you need to track, then choose devices that fit. The reverse often leads to equipment that doesn’t suit the job.
Choosing Labels as an Afterthought
Labels that fade, tear or smudge cause failed scans. Choose them with the same care as the scanner.
Skipping the Numbering Plan
Duplicate or inconsistent codes create errors that are hard to untangle later.
Not Testing Before Rollout
A small pilot finds problems cheaply. A full rollout finds the same problems at full cost.
A Simple Barcode System Setup Checklist
- What exactly will you track, and where?
- Which barcode types do your products, locations or assets need?
- Do you have a clear, unique numbering plan?
- Which labels and printer suit how long codes must last?
- Which scanners or mobile computers suit each job?
- Which software will receive the data, and does it work with your devices?
- Is Wi-Fi coverage and charging planned where scanning happens?
- Have you run a pilot and trained your team?
Conclusion
Setting up a barcode system from scratch is manageable when you take it in order: define what you track, choose barcode types, plan your numbering, pick labels and printers, select scanners, connect your software, then test and train before rolling out.
Planning these parts together, instead of buying them one at a time, is what keeps the system fast, accurate and easy to maintain.
If you would like help with any step, Pointus Solutions can advise and supply the hardware and software.
Ready to Build Your Barcode System?
Tell Pointus Solutions about your business and we will recommend the right scanners, labels, printers and software, configured and ready to deploy.
Setting Up a Barcode System, Answered
You need four things: barcodes that identify your items or locations, labels and a printer to produce them, scanners or mobile computers to read them, and software that stores and uses the scanned data.
It depends on the use. EAN and UPC are standard for retail products, Code 128 is commonly used for internal tracking and shipping labels, and 2D codes such as QR Code and Data Matrix hold more data in a small space.
If you sell products through retailers or marketplaces, they usually require standard EAN or UPC barcodes issued through GS1, so check their requirements. For internal tracking only, you can create your own codes.
A 1D scanner reads traditional linear barcodes only. A 2D scanner, or imager, reads linear barcodes as well as 2D codes such as QR codes and Data Matrix.
Direct thermal labels are printed with heat alone and need no ribbon, but the print can fade over time with heat and light. Thermal transfer labels are printed using a ribbon, which suits labels that must stay readable for longer.
Run a small pilot first. Check that every printed code scans on every device, that scans work in real conditions, and that the data appears correctly in your software, before you roll the system out more widely.
Pointus Solutions, based in Hawally, Kuwait, supplies barcode scanners, labels and ribbons, label printers and mobile computers. Contact the team on +965 9742 3453 or WhatsApp.